

Good Morning Everyone! My Tuesday Tutorial is a Chapstick Holder created with the Stampin' Up! You Are My Anchor April 2018 Paper Pumpkin Kit. This is one of the Alternative Projects I shared on Monday. Not only was it Quick and Easy, but also it makes a cute little gift for Summer! Look below for the Free Tutorial!
Chapstick Holder Measurements:
Island Indigo Base: 3" x 6" (Score at 2 3/4" and 3 3/8")
Paper Pumpkin Note Card Layer: 2 1/2" x 2 3/4"
Inside Whisper White Layer: 1 3/4" x 2 3/4"
Paper: Island Indigo, Whisper White
Ink: Island Indigo
Stamp: You Are My Anchor
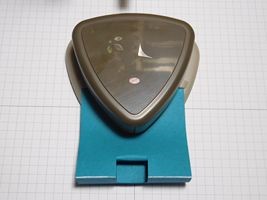
Accessories: You Are My Anchor Paper Pumpkin Kit, Detailed Trio Punch, 2" Circle Punch, Chapstick
Product List


You Are My Anchor Chapstick Holder Tutorial

1. You will need 1 sheet of Island Indigo card stock, 1 sheet of Whisper White card stock, 1 note card base from the You Are My Anchor Paper Pumpkin Kit, the 2" Circle Punch, and the Detailed Trio Punch.

2. Cut the Island Indigo card stock at 3" x 6" then score it at 2 3/4" and 3 3/8".

3. Fold the card stock on one of the score lines, then make 2 cuts up to the second score line.

4. Open and fold the card stock like a book. The middle section shop pop out like a step.

4. Close the card stock base and punch with the Detailed Trio Punch.
5. Cut 1 note card base at 2 1/2" x 2 3/4, and 1 piece of Whisper White card stock at 1 3/4" x 2 3/4". Then punch a piece of Island Indigo card stock with the 2" Circle Punch.

6. Use adhesive to attach the note card and Island Indigo pieces to the Chapstick Holder base.

7. Stamp the inside and add a flavored Chapstick.
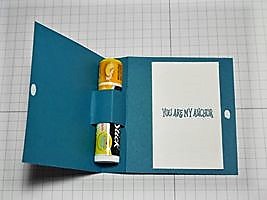
8. Decorate!

Happy Stamping!


No comments
Post a Comment
Thank you for your kind words!