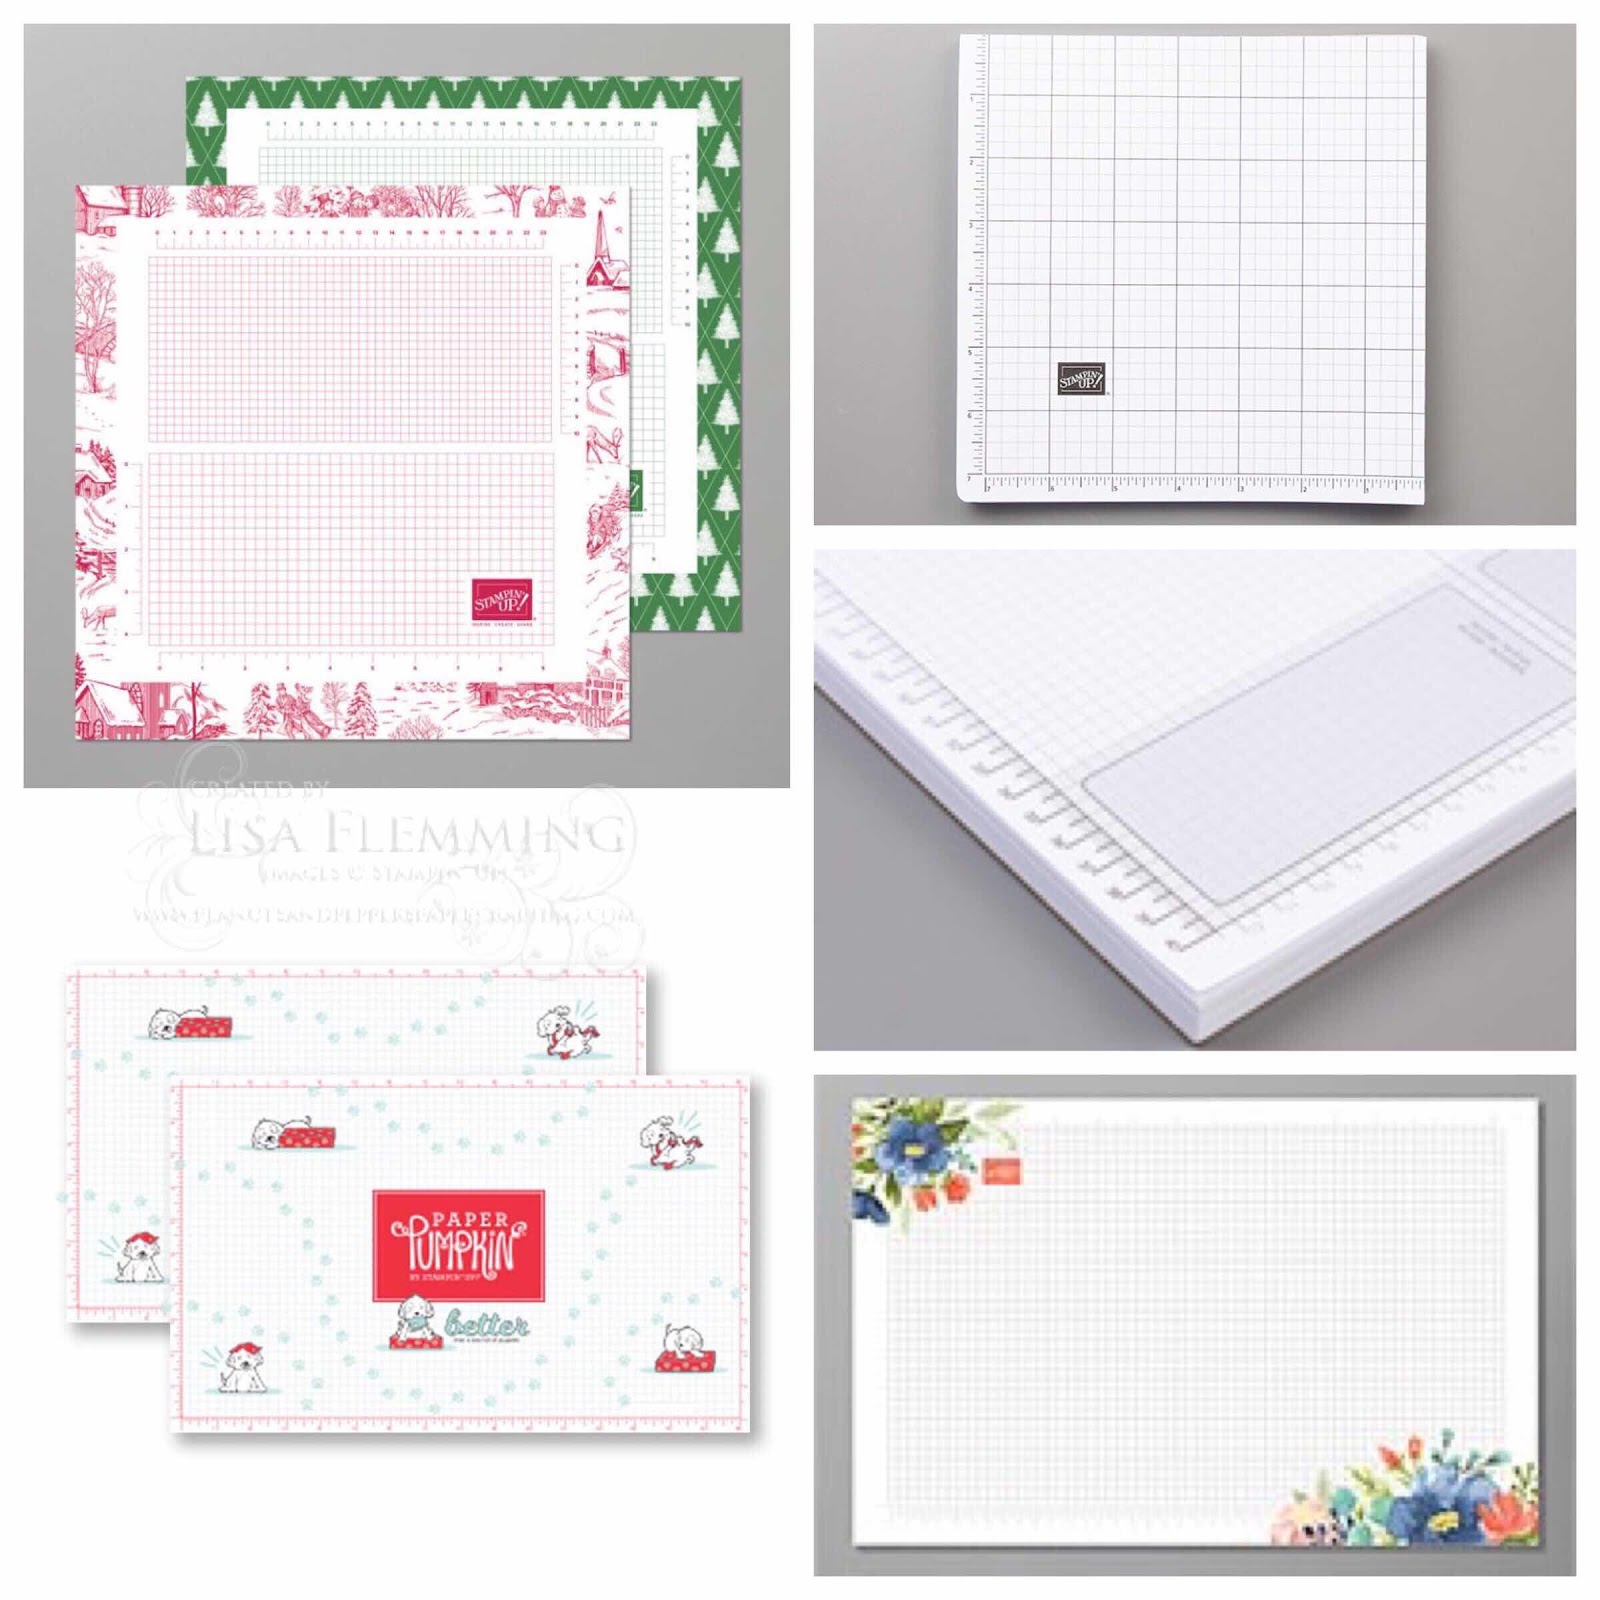
What's Up! Wednesday - New Grid Paper! (Protect Your Craft Area!)


Stampin’ Up! Grid Paper

Happy Hump Day Everyone! Stampin' Up! has added New Paper Pumpkin and Seasonal Grid Paper to our Tool lineup.The Seasonal 2019 13" X 13" (33 X 33 Cm) Grid Paper (153984) is a Special Edition Christmas Theme Paper, while the Paper Pumpkin Grid Paper (153985) channels the warm and fuzzy  “Better Than a Box Full of Puppies” Campaign.  Both of these not only protect your stamping and craft work space, but also serve as scratch paper and makes cleaning up a breeze. I use Grid Paper in all my workshops and classes. 

Quick Trick:

If you struggle with lining up and spacing your titles, stamp them on the grid paper first, following the grid lines. Then place the grid paper over your project but below where you want your title. Line up the stamps following the same grid lines you used to stamp your title on the grid paper.

Go Here To Order: lisaflemming.stampinup.net


Happy Stamping!


Tuesday Tool - Stampin' Up Buttons


Season's Greetings Everyone! Today's Tuesday Tool is the Stampin' Up Buttons. Available in Bitty and Designer, the buttons are excellent accessories to add to all of your papercraft creations.


Features & Benefits


  • Wonderful accents to add to cards, scrapbook pages, and more

  • Available in Stampin’ Up!’s exclusive colors so they coordinate with your paper and card stock

Bitty Buttons

  • Clear acrylic buttons

  • Come in 4 shapes: circle, flower, scallop circle, and heart

  • Coordinate with Itty Bitty Bits Set

  • Circle, flower, and heart coordinate with Itty Bitty Shapes punch pack

  • 64 buttons per container: 16 each of 4 styles

  • Approximate diameter: 3/8"

Designer Buttons

  • Colored polyester buttons

  • Come in 3 designs:

  • 3/4" marbled circle
    5/8" double circle
    3/8" flower

  • 72 buttons per container: 4 each of 3 designs in 6 colors

  • Available in color collections

  • Brights: Daffodil Delight, Old Olive, Pumpkin Pie, Real Red, Rich Razzleberry, and Tempting Turquoise

  • Neutrals: Basic Black, Basic Gray, Crumb Cake, Early Espresso, Very Vanilla, and Whisper White

  • Regals: Cajun Craze, Cherry Cobbler, Elegant Eggplant, Garden Green, More Mustard, and Night of Navy

  • Subtles: Certainly Celery, Marina Mist, Rose Red, Perfect Plum, Pretty in Pink, So Saffron

Quick Trick


Put a coordinating punched image under a Bitty Button or stamp directly on the button with StazOn ink.


Distressing adds a nice vintage touch to Designer Buttons. Simply sand a bit with Sanding Blocks or use the sanding tools from Distressing Essentials.


FYI


Buttons stick on easily with Mini Glue Dots, and you can also use a bit of Linen Thread and sew them on your projects.

Tuesday Tool - Stampin' Up Mini Glue Dots

Good Morning Everyone! Today's Tuesday Tool is the Stampin' Up Mini Glue Dots. Use them to adhere 3-D accents to your papercraft projects with no fumes, no mess, and no drying time. Super sticky, the Mini Glue Dots are 3/16" in diameter and come 300 to a box.

Features & Benefits
  • Super-sticky, double-sided adhesive dots
  • No fumes, no mess, no drying time required
  • Bond instantly to a variety of materials: paper, fabric, wood, foam, plastic, and more
  • Easy to use
  • Photo safe
  • 300 per roll
  • Each dot measures approximately 3/16" in diameter
  • Great for attaching embellishments

Quick Trick

The best way to place Glue Dots is to press your project against the Glue Dot dispenser—you don’t even need to touch the Glue Dots!

FYI

Size of dots may vary plus or minus 1/16".

Press the paper or object onto the dot, then pull it away; the dot will adhere to the object. Don’t try to pull the dot off the liner paper with your hands—it will stick to you and not the paper!

If you would like to order the Stampin' Up Mini Glue Dots, click here. Enjoy!

Tuesday Tool - Stampin' Up Big Shot Die Storage and Inserts


Good Evening Everyone! Today's Tuesday Tool is the Stampin' Up Big Shot Storage and Inserts. These boxes are perfect for storing all of your Big Shot Dies and will keep you organized. With a high-quality weave fabric printed interior, the boxes stack easily with lids that sit flush to the sides. Accordingly, the front of each box is adorned with a metal frame which can be labeled to identify the contents.

The plastic insert sits in the box to organize the contents like a file folder. Included adhesive strips let you permanently secure insert inside box or a drawer. Purchase additional inserts if you'd like to store dies upright in a drawer or shelf without the box.

If you would like to purchase the Big Shot Die Storage or Inserts, click here. Enjoy!

Tuesday Tool - Clear Mount Blocks


Good Morning Everyone! Today's Tuesday Tool are Stampin' Up Clear Mount Blocks. These high-quality, sturdy acrylic blocks are used with Stampin' Up's Clear Mount Rubber Stamps. Each block is etched with a letter for quick identification and all four sides of 3/4" of the block are grooved for easy gripping. These blocks are also available in a bundle price.


Features & Benefits


  • Made from high-quality, sturdy acrylic

  • 3/4" thick with letter etched on side for easy identification

  • Available in nine sizes: o Block A (1-3/16" x 1-1/4")
    o Block B (1-5/8" x 1-15/16")
    o Block C (2" x 2-1/4")
    o Block D (2-7/8" x 2-11/16")
    o Block E (3-7/16" x 4-7/16")
    o Block F (4-7/8" x 6")
    o Block G (3/4" x 2-1/2")
    o Block H (1-5/8" x 4-7/16")
    o Block I (2-1/4" x 5-7/8")

  • The acrylic block bundles include one block of each size

  • Clean most inks from acrylic block using Stampin’ Mist

FYI


To adhere the stamp to the clear block, press it on the block using moderate pressure and hold for a few moments.


Stamps will adhere best to a clean block. Although you don’t need to clean the block after each use, you’ll need to clean it occasionally so the stamps adhere well.


You can remove most ink stains from the block using Stampin’ Scrub and Stampin’ Mist.


Do not use StazOn cleaner on the blocks. StazOn cleaner will leave an oily residue on the blocks, making it difficult for stamps to adhere to the block. Avoid staining the blocks with StazOn ink.


If you would like to purchase the Stampin' Up Clear Mount Blocks, click here. Enjoy!

Tuesday Tool - Stampin' Up Envelopes

Good Morning Everyone! Today's Tuesday Tool are the Stampin' Up Envelopes. Available in different sizes and shapes, each one features Stampin' Up's signature rounded flap to give your cards and papercraft creations a softer finish.

Features & Benefits
  • Provide perfect finishing touch for cards

Medium Clear Translucent

  • Clear polypropylene
  • 5-3/4" x 4-3/8" (opens on shorter side)
  • 50 per package
  • Adhesive strip for sealing
  • Safe for scrapbooks
  • Perfect for protecting stamped art
  • Requires extra postage; contact your local post office for more information
  • Acid free

Medium Rectangular

  • Available in Crumb Cake, Naturals Ivory, Naturals White, Whisper White, and Very Vanilla
  • 5-3/4" x 4-3/8" (fits standard-size, 5-1/2" x 4-1/4" card)
  • 40 per package
  • Exclusive Stampin’ Up! envelope flap design
  • Acid free, lignin free, buffered
  • Medium Square
  • Available in Whisper White
  • 5-1/2" x 5-1/2"
  • 20 per package
  • May require extra postage; contact your local post office
  • Exclusive Stampin’ Up! envelope flap design
  • Acid free, lignin free, buffered

Mini Square

  • Available in Whisper White
  • 3-1/8" x 3-1/8"
  • 40 per package
  • Cannot be mailed
  • Exclusive Stampin’ Up! envelope flap design
  • Perfect for creating small gift tags or sending little love notes
  • Acid free, lignin free, buffered

Small Open-End

  • Available in Whisper White
  • 6-3/4" x 3-1/2"
  • 20 per package
  • Great for holding money or for preserving memorabilia
  • Acid free, lignin free, buffered

Sweet Treat Padded Envelopes

  • 8-3/8" x 5-1/2" padded envelopes
  • 3 per package
  • Cushion and protect cards made with Treat Cups and other delicate cards
  • Require extra postage; check with your local post office before mailing

Quick Trick

Use a Brayer and Classic Stampin’ Pad to create a custom-colored envelope.

To line an envelope, cut out Designer Series Paper to fit and adhere to inside of envelope.

If you would like to purchase any of the Stampin' Up Envelopes, click here. Enjoy!

Tuesday Tool - Ribbon Keeper


Good Morning Everyone! Today's Tuesday Tool is the Stampin' Up Ribbon Keeper. These stackable storage boxes offer and organized way to store your ribbon. Because the Ribbon Keeper comes in three different sizes, small, medium, and large; you can create customized ribbon storage based upon your needs.

Features & Benefits

  • Compact ribbon storage case; conserves space and brings organization to your stamp area
  • 2 boxes, 2 divider slides, 6 connector tabs, and 12 rubber feet in each package
  • Available in 3 sizes
  • Small holds 1/8" and 3/8" ribbon; approximate size 6-3/8" x 3-1/8" x 3-1/8"
  • Medium holds 5/8" and 1-1/4" ribbon; approximate size 6-3/8" x 3-3/4" x 3-3/4"
  • Large holds 1/4" and 1/2" ribbon; approximately 6-3/8" x 4-7/8" x 4-7/8"
  • Clear plastic case lets you see contents at a glance, making it easy to choose accessories for your next project
  • Stampin’ Up! exclusive design
  • Protects ribbon from dirt and dust
  • Includes instructions for assembly


FYI

You need to insert the tabs only if you intend to stack your Ribbon Keepers.

To easily add ribbon to your Ribbon Keeper or remove ribbon from it, unsnap the front of the Ribbon Keeper and fold it down.

To keep your ribbon standing upright, use the plastic insert.

If you would like to purchase the Stampin' Up Ribbon Keeper, click here. Enjoy!

Tuesday Tool - Stack and Store Caddy


Good Morning Everyone! Today's Tuesday Tool is the Stampin' Up Stack and Store Caddy. Designed exclusively for Stampin' Store Containers, the Stack and Store is housed on a turntable which holds 24 containers. Each one can be removed easily with one hand! This is a must for your stamping/papercrafting area.

Features & Benefits

  • Stores buttons, brads, and anything packaged in the Stack & Store containers
  • Stores 24 large containers or 48 small containers
  • Made of strong durable plastic
  • Die-cast aluminum handle for ease in turning
  • Takes little space: approximately 6" in diameter and 12" tall
  • Swivel base allows unit to turn 360 degrees
  • Stampin' Store containers available separately

If you would like to purchase the Stampin' Up Stack and Store Caddy, click here. Enjoy!

Tuesday Tool - Clear Block Storage Caddy


Hello Everyone! Today's Tuesday Tool is the Clear Block Storage Caddy. With this caddy, there is a space for each of Stampin' Up's Clear-Mount Blocks. Foam inserts hold each of the blocks in place with finger holes to easily remove them for stamping. An additional foam insert sits between blocks to protect them when the caddy is closed. Caddy opens flats for easy access to blocks. Caddy shuts tightly and locks, making it easy to carry to a crop or to store simply at home. A built-in handle makes the Clear Block Storage Caddy easy to carry.
Features and Benefits
  • Helps you organize clear-mount blocks
  • Holds 1 of each clear block size that Stampin' Up offers
  • Foam insert holds each block in place; separate foam insert goes between blocks to protect them when caddy is closed
  • Finger holes in foam insert make it easy to remove blocks from caddy opens flat
  • Built-in handle; easy to carry

To order the Stampin' Up Clear Block Storage Caddy, click here. Enjoy!

Tuesday Tool - Color Caddy


Good Morning Everyone! Today's Tuesday Tool is the Stampin' Up Color Caddy. I cannot tell you how much I love the Color Caddy! It holds 48 Classic Stamp Pads and 48 Ink Refills. Plus, it rotates for easy access to all of your ink. Some assembly is required and if you run out of room, the Color Caddy Extender Kit includes 3 stacking trays to accomodate 12 additional Stampin' Up Pads.


Features & Benefits

  • Compact caddy helps you store and organize ink pads and refills
  • Color Caddy
  • Holds 48 Classic or Craft Stampin’ Pads
  • Made of strong, durable plastic
  • Top tray holds up to 48 ink refills or other stamping accessories
  • Rotates 360 degrees
  • Die-cast aluminum handle for ease in turning
  • Requires a 10-inch square space on tabletop or counter
  • Approximately 16-1/2" tall
  • Color Caddy Extender kit available

Color Caddy Extender Kit

  • Add 3 additional stacking storage trays to the Color Caddy
  • Holds 12 additional stamp pads
  • Made of strong durable plastic
  • Extender rod and instructions included

FYI

Some assembly is required; instructions are included.

If you would like to order the Stampin' Up Color Caddy, click here. Enjoy!

Tuesday Tool - Big Shot Die Cutting Machine


Good Morning Everyone! Today's Tuesday Tool is one of my favorite machines, The Big Shot! With the Big Shot you can create die cuts with exclusive Stampin' Up Dies or Dies made specifically for this machine. This is perfect for card making, scrapbooking or any papercrafting project. The Big Shot includes standard cutting pads and a multipurpose platform so you can start cutting immediately.


Features & Benefits

  • Manual, multipurpose die-cutting system
  • Use to quickly and easily create die-cut or embossed shapes, envelopes, tags, and baskets
  • Great for cards, scrapbook pages, home décor, and more
  • Cuts a variety of materials
  • Portable; no electricity required
  • Can be used with dies from any die manufacturer
  • Big Shot machine comes with 2 Standard Cutting Pads and Multipurpose Cutting Platform; all other dies and accessories are sold separately

Dies

  • Steel-ruled (Bigz, Bigz Clear, Bigz L, Bigz XL, Originals, and Movers & Shapers) dies
  • Cut through a variety of materials, such as Texture Cuts Wood Sheets, Window Sheets, On Board Long Board, and Décor Elements
  • Use with Cutting Pads; Multipurpose Platform not required
  • Chemically-etched (Clearlits, Decorative Strip, Embosslits, Sizzlits, Textured Impressions, Texturz Plates) dies
  • Cut through Designer Series paper, card stock, or other thin materials
  • Designed to cut through one sheet of paper or card stock at a time
  • Use with Cutting Pads and Multipurpose Platform
  • See Idea Book & Catalog for die images

Bigz and Bigz Clear Dies

  • Die size: 5-1/2" x 6"
  • Use with Standard Cutting Pads
  • Bigz Clear dies are clear so you can easily position the die over the image you want to cut out
  • Use with Standard Premium Crease Pad for dies with score marks

Bigz L Dies

  • Die size: 6" x 8-3/4"
  • Use with Standard or Extended Cutting Pads
  • Use with Standard or Extended Premium Crease Pad for dies with score marks

Bigz XL and Bigz XL Movers & Shapers Dies

  • Die size: 6" x 13-3/4"
  • Use with Extended Cutting Pads
  • Use with Extended Premium Crease Pad for dies with score marks
  • Magnetic Movers & Shapers dies have moveable magnetic pieces that allow you to custom place a window in a card front
  • Magnetic Movers & Shapers die size: 2-15/16" x 2-7/16"


Accessories

Cutting Pads

  • Essential for cutting with any die
  • Can be turned over for twice the wear
  • Standard Cutting Pads (for Bigz, Bigz Clear, Bigz L, Bigz XL, Clearlits, Embosslits, Originals, Sizzlits, and Textured Impressions): 8-7/8" x 6-1/8"
  • Extended Cutting Pads (for Bigz L, Bigz XL, and Movers & Shapers dies): 14-5/8" x 6-1/8"
  • Decorative Strip Cutting Pads (for Decorative Strip dies): 13" x 2-1/2"
  • 1 pair per package
  • 1 pair of standard cutting pads included with Big Shot machine

Standard Premium Crease Pad

  • Creates subtle fold lines when used with rule-based dies that have score marks
  • Standard Premium Crease Pad (for Bigz and Originals dies): 8-3/4" x 6-1/8"
  • Extended Premium Crease Pad (for Bigz XL dies): 13-1/2" x 6-1/8"
  • 1 pad and 2 shims per package

Multipurpose Platform

  • Required for cutting with chemically-etched dies and dies from other manufacturers
  • Instructions on platform explain how to use it
  • Included with the Big Shot machine; not sold separately

Decorative Strip Spacer Platform

  • Required for cutting with Decorative Strip dies
  • Size: 13" x 2-5/8"
  • 1 platform per package

Standard Texturz Impressions Pad

  • Use with Standard Texturz Silicone Rubber when embossing with Texturz Plates
  • Size: 8-7/8" x 5-7/8"
  • 1 pad per package

Texturz Silicone Rubber Pad

  • Use with Texturz Impressions Pad when embossing with Texturz Plates
  • Size: 7-3/8" x 5-3/4"
  • 1 pad per package

Doctor’s Bag

  • Can hold the Big Shot, cutting pads, and dies
  • Approximate size: 14-1/2" x 12-1/2" x 13"
  • Black and white with 2 outside pockets and multiple inner pockets
  • Detachable strap for easy carrying
  • Skid pads protect bottom of bag
  • Made of polyester, vinyl, and nylon, with cast zinc rings and hooks
  • Stampin’ Up! logo on front


FYI

When using Bigz or Originals dies that have score marks, perforations, or lots of details, we recommend that you cut just one piece of paper at a time. Use the Premium Crease Pad with dies that have score marks for best results.

Steel-ruled dies have sharp edges—handle with care.

When cutting intricately-detailed images, paper (or other material) may become caught in the die. Remove carefully to prevent ripping.

Not all materials will work well with some designs. Experiment a bit with your dies and materials to make sure you get the cutting results you want.

If you would like to purchase the Stampin' Up Big Shot Machine, click here! Enjoy!
Tuesday Tool - Heat and Stick Powder


Good Morning Everyone! Today's Tuesday Tool is the Stampin' Up Heat and Stick Powder. Use it to adhere Stampin' Glitter and Stampin' Emboss Powder using the Heat Tool to your papercraft creations.

Features & Benefits
  • Heats to a sticky surface to hold glitter
  • Use with Craft Stampin’ Pads or VersaMark Pad
  • 1/2 oz.

Quick Trick

After stamping with Craft or VersaMark ink, pour Heat & Stick Powder liberally over your design. Shake excess powder onto a Powder Pals tray, and pour it back into the bottle. Heat the stamped image with a Heat Tool just until the powder changes to a shiny liquid. Quickly sprinkle glitter over the sticky powder. Shake off excess. Briefly heat again to set the glitter.

FYI

Place Heat & Stick Powder in a bigger container and shake it if it clumps.
Close the lid of the ink pad when applying powder.
Use tweezers for dipping punched images in powder.

If you would like to purchase the Heat and Stick Powder, click here. Enjoy!

Tuesday Tool - Dotto

Good Morning Everyone! Today's Tuesday Tool is the Dotto adhesive. In a convenient dispenser, the Dotto puts repositionable dots on your papercrafting projects that are acid free. Plus, whenever you run out, there are refills available.


Features & Benefits

  • 585" of temporary, self-adhesive dots on paper backing

  • Convenient dispenser rolls dots from paper backing onto card stock, photograph, or accent

  • Use to reposition pictures and artwork without causing damage

  • Use to create a temporary mask

  • Adhesive is solvent free

  • Refill available


FYI

To remove excess adhesive, rub your finger gently over dots.

Tuesday Tool - Crystal Effects


Good Morning Everyone! Today's Tuesday Tool is the Crystal Effects Adhesive. Using Crystal Effects, you can add a lacquered dimensional look to all of your papercraft projects.

Features & Benefits

  • Gives a high-gloss finish to any image
  • Creates amazing 3-D effects
  • Applicator tip provides great control
  • Distributed exclusively by Stampin’ Up!
  • Water based for quick and easy cleanup
  • Dries completely within an hour, depending on how thickly it is applied
  • 2 oz.

Quick Trick

Add a drop or two of our Classic Ink refill to the Crystal Effects, and you’ll have a high-gloss colored finish.

Crystal Effects also works great as an adhesive to attach buttons and other heavier embellishments. Add a three-dimensional effect to your projects with Crystal Effects. Simply apply a thick line of Crystal Effects to the outline of your stamped image. After the line has dried, add a thinner coat of Crystal Effects to the inside area of what was outlined.

FYI

Crystal Effects can be used with any stamped image that has been colored with any medium: Watercolor Wonder Crayons, Stampin’ Write Markers, Stampin’ Pastels, Stampin’ Pads.

Do not shake. Shaking Crystal Effects will cause bubbles that will show up in your work.

Recap after use to prevent the tip from drying and clogging.

Allow approximately one hour drying time.

For best results, use Crystal Effects within one year of purchase.

If you would like to purchase the Crystal Effects Adhesive, click here.

Tuesday Tool - Color Catcher


Good Morning Everyone! I hope you all had a wonderful Labor Day Weekend! Today's Tuesday Tool is the Color Catcher. I have to tell you that it has so many uses and it has kept my furniture and floors from getting mists, sprays, glitter and other mediums from getting all over! The
Color Catcher coordinates well with the Smooch Spritz and Color Spritzer Tool.

Features & Benefits
  • Catches overspray from Smooch Spritz and other sprays that can spatter work areas
  • Compact and portable
  • Easy to assemble
  • Dimensions when open: 10" x 10" x 10"


FYI

To use, simply place your project inside the Color Catcher and spray.

If you would like to purchase the Color Catcher, click here. Enjoy!

Tuesday Tool - The Tearing Edge


Good Morning Everyone! Today's Tuesday Tool is the Tearing Edge. It is great for creating natural looking torn edges on your papercraft projects.


Features & Benefits


  • Creates a perfect torn edge

  • Approximately 13" x 1-1/2"

  • Stainless steel

  • 2 different edges with different tear designs

  • Comes with protective vinyl pouch

FYI


Hold The Tearing Edge firmly in place against card stock, paper, or vellum, and tear slowly.
When you tear vellum by hand, you get a straight edge. Use The Tearing Edge to get a torn look with vellum.


If you would like to purchase the Tearing Edge, click here. Enjoy!

Tuesday Tool - Sticky Pages


Good Morning Everyone! Today's Tuesday Tool is the Stampin' Up Sticky Pages. With the Sticky Pages you can create your own adhesive-backed die cuts from the Big Shot dies or use them to decorate On Board albums with Designer Series Paper. The sky is the limit!


Features & Benefits


  • Blank, double-sided acrylic adhesive sheets you can use to cover On Board albums or use with the Big Shot

  • Use with Big Shot to create custom adhesive-backed letters and shapes

  • 12" x 12" sheets

  • 2 sheets per package

FYI


This is a pressure-sensitive adhesive material; apply pressure to the image to properly adhere the project before removing the red transparent liner.


If you would like to order the Sticky Pages, click here.

Tuesday Tool - Stampin' Dimensionals


Good Morning Everyone! Today's Tuesday Tool is the Stampin' Dimensionals. Acid free, the double-sided Stampin' Dimensionals add depth and dimension to all of your papercrafting projects. They are one of my favorite go to adhesives!


Features & Benefits

  • Double-sided, self-adhesive foam mounts

  • 1/16" diameter

  • 300 per package

  • Use multiple Stampin’ Dimensionals for multilevel projects or added height

  • Great for layering and 3-D effects

If you would like to order the Stampin' Dimensionals, click here. Enjoy!

Tuesday Tool - Distressing Essentials Kit


Good Morning Everyone! The Tuesday Tool for today is the Stampin' Up Distressing Essentials Kit. With this kit, you can easily get the distressed look in all of your papercrafting projects.


Features & Benefits


  • Helps you create an aged, vintage look on card stock, paper, and more

  • Includes a variety of distressing tools

  • Sanding tools

  • 1 sanding block: approximate size 3" x 3/4" x 1-1/2"

  • 1 two-sided emery board: approximate size 4" x 3/4"

  • 3 precision files: approximate length 5-1/2"

  • Inking tools

  • 4 distressing ink spots, 1 each of Charcoal, Mahogany, Navy, and Tea Stain: approximate size 1" x 1"

  • Flat stamp for applying ink: approximate size 1" x 1-1/2"

  • Sanding block and emery board have Stampin’ Up! design

  • Precision files fit inside areas that are too small for sanding blocks, such as the inside areas of On Board letters

  • Sanding block, emery board, and precision files are great for smoothing edges of card stock or Designer Series Paper that has been adhered to On Board chipboard

  • Distressing ink is water-based and blendable

  • Distressing ink contains alcohol; do not use in scrapbooks

  • Comes in soft plastic case

FYI


To get an aged look with the distressing ink, you’ll need to mist the ink with water either before or after you apply it to your project. The water will cause the ink to dilute and bleed, resulting in a vintage appearance.


To get a subtle ink stain look, use the flat stamp to apply the vintage ink to your projects. (If you apply the ink directly from the spot to the paper, the ink will look too concentrated.) Dab the ink pad on the flat stamp and rub it over your paper. You can mist the ink while it’s on the stamp and then apply it to your project, or you can apply it to your project and then mist the ink.


You can also use an Aqua Painter to apply the ink directly to a stamped image (be sure to use a waterproof ink like StazOn on your stamped image before coloring it with distressing ink).


Vintage inks contain alcohol, so they are not recommended for scrapbooking.


The inks work best on paper that has been crinkled or embossed. Crumple card stock or paper into a ball, and then smooth it out. Dab the ink on your stamp and rub it over the card stock. The ink will be thicker on the creases in the paper, resulting in an aged, distressed look. To intensify the distressed look, lightly mist your card stock with water so the ink bleeds. After the card stock dries, you can sand the edges to distress your project even more.


If you would like to order the Stampin' Up Distressing Essentials Kit, click here. Enjoy!

Tuesday Tool - Color Coach


Good Morning Everyone! Today's Tuesday Tool is the Stampin' Up Color Coach. With the Color Coach you can put together color schemes for all of your papercrafting projects. It includes 55 double-sided cards with a removable metal post fastener. You have a quick reference of all colors in a collection, a card for every color, a card showing cross-collection combinations, and blank cards to record your own color combinations.
Features and Benefits
  • 55 Double-sided cards measuring 2 3/4 x 4 1/2
  • Durable cards are made from heavy-weight card stock
  • Removable metal post fastener
  • Shellie's favorite combinations are marked with a heart
  • Available in English or Multiple Languages

Tips:

Yellows are good partners in general and will work in a pinch as a third color in combinations.

Dynamic Duos are Stampin' Up colors in monochromatic schemes. If a Dynamic Duo is available for a specific color, it will be listed on that color card. They also work well for choosing color schemes for stamping Two-Step Stampin images or choosing card stock and ink combinations.

Using a neutral as your main color can increase the emphasis and intensity of accent colors you choose.

If you would like to order the Stampin' Up Color Coach, click here. Enjoy!

Related Posts with Thumbnails
Blogger Template Created by pipdig