Sunset Coast Birthday Card with the Double Vision Technique


Hello Crafty Friends! 🌅 Today's Share is a Birthday Card featuring the Stampin' Up! Sunset Coast Bundle and Scenic Coast 6" x 6" Designer Series Paper. I used the Double Vision Technique to create a beautiful three-dimensional sunset background, then added coordinating nautical die cuts for the perfect coastal scene. A stamped sentiment and 2025–2027 In Color Flat Pearls complete this quick and elegant handmade birthday card. This simple technique creates stunning results for any occasion!


Paper: Basic White, Blueberry Bushel, Secret Sea, Strawberry Slush, Timid Tiger, Scenic Coast 6” x 6”  Specialty Designer Series Paper


Ink: Blueberry Bushel, Secret Sea, Timid Tiger


Stamp: Sunset Coast, Banner Sayings (Sentiment)


Accessories: Sunset Coast Dies, Stampin’ Cut & Emboss Machine, Three Banner Punch, 2025-2027 In Color Flat Pearls


Happy Stamping!


Easy Card Making: Joseph’s Coat Technique Thinking of You Card


Hello Crafty Friends! Thinking of You cards are even more special when made by hand! 💕 This quick and easy card features the Floral Spray 3D Embossing Folder and the Joseph’s Coat Technique to showcase the gorgeous 2026–2028 In Colors—Crisp Cantaloupe, Golden Glow, Hydrangea Hue, and Peaceful Pine. Finished with a sentiment from Phrases & Frames and sparkling In Color Dots, this technique creates a stunning background with endless color possibilities!


Shop Here: lisaflemming.stampinup.net


 Happy Stamping!


Elegant Thinking of You Card with the Shadow Blocking Technique


Hello Crafty Friends! Today's share is a Thinking of You Card created with the Stampin' Up! Boutique Blossoms Bundle. I used the Shadow Blocking Technique with Brushed With Beauty Designer Series Paper and added a focal point using the Scalloped Blooms Bundle. A few 2025-2027 In Color Flat Pearls were the perfect finishing touch!


I love how this simple technique creates such a beautiful and elegant handmade card.


Card Measurements:

Mossy Meadow Base: 4 1/4” x 11” (Score at 5 1/4”)

Very Vanilla Card Layer: 5 1/4” x 4”

Calypso Coral Card Layer: 5” x 3 3/4”

Mossy Meadow Squares: 1” x 1” (12 Pieces)

Brushed With Beauty DSP Layers: 1” x 1” (12 Pieces)


Paper: Calypso Coral, Darling Duckling, Mossy Meadow, Very Vanilla, Brushed With Beauty 12” x 12” Designer Series Paper 


Ink: Calypso Coral


Stamp: Scalloped Blooms (Sentiment)


Accessories: Boutique Blossoms Dies, Scalloped Blooms Dies, Stylish Shapes Dies, Stampin’ Cut & Emboss Machine, 2025-2027 In Color Flat Pearls 


Happy Stamping!


Cap & Gown Pleated Paper Graduation Card


Good Morning Crafty Friends! Today’s Share is a Graduation Day Card created with the Stampin’ Up! Cap & Gown stamp set. It features the Pleated Paper Technique I learned from Lisa Curcio. Not only is it Quick and Easy, but also it can be customized with other school colors as well!! Look for this stamp in the Online Exclusives. 

Shop Here: http://lisaflemming.stampinup.net/

Here Are The Details:

I used the Banners Pick A Punch on the Sentiment, and the Classic Letters Stamp on the coordinating Envelope.


Card Measurements:

Night of Navy Card Base: 4 1/4” x 11”
Basic White Card Layer: 4 1/8” x 5 3/8”
Boho Blue Embossed Card Layer: 3 7/8” x 5 1/8”
Basic White Card Layer: 3” x 4 3/8”
Night of Navy Card Layer: 2 3/4” x 4 1/8”
Basic White Banner Layer: 3/4” x 3”
Poetic Expressions Designer Series Pleated Paper Layer: 4” x 7”
(Score at 1/2”, 1”, 2”, 2 1/2”, 3 1/2”, 4”, 5”, 5 1/2”, 6 1/2”

Paper: Basic White, Boho Blue, Night of Navy, Poetic Expressions 12” x 12” Designer Series Paper 

Ink: Night of Navy, Daffodil Delight Stampin’ Blends

Stamp: Cap & Gown, Classic Letters

Accessories: Cap & Gown Embossing Folder (My Stash), Stampin’ Cut & Emboss Machine, Banners Pick A Punch, Rhinestone Waves Basic Jewels 

Happy Stamping!

Lovely & Sweet Mother’s Day Card


Good Morning Crafty Friends! Today’s Share is a Mother’s Day Card created with the Stampin’ Up!  Lovely & Sweet stamp set and coordinating Lovely & Sweet dies. It features a fabulous Background Technique using Linen Thread and the Perennial Postage dies. Look for these products in the Stampin’ Up! Annual Catalog 2024-2025!!

Shop Here: http://lisaflemming.stampinup.net/

Here Are The Details:

I wrapped Linen Thread around the edges of the Perennial Postage dies to get the crisscross design. I secured the ends in place with tape. You can start at any point and get multiple variations.


Card Measurements:

Lost Lagoon Card Base: 4 1/4” x 11”
Poetic Expressions Designer Series Paper Layer: 5 1/4” x 4’
Lost Lagoon Layer: 2 1/2” x 4”
Vellum Card Layer: 2” x 3 1/2”
Inside Basic White Card Layer: 5 1/4” x 4”

Paper: Basic White, Lost Lagoon, Vellum, Poetic Expressions 12” x 12” Designer Series Paper 

Ink: Tuxedo Black Memento, Daffodil Delight Stampin’ Blends, Mossy Meadow Stampin’ Blends, Pecan Pie Stampin’ Blends

Stamp: Lovely & Sweet 

Accessories: Lovely & Sweet Dies, Perennial Postage Dies, Stylish Shapes Dies, Stampin’ Cut & Emboss Machine, Paper Butterfly Accents, Iridescent Pearl Basic Jewels, Linen Thread

Happy Stamping!

Make It Monday - Stippled Roses Birthday Card


Good Morning Crafty Friends! My Make It Monday Share is Birthday Card created with the  Stamping Up! Stippled Roses stamp set and coordinating Stippled Roses dies. I used the New Softly Stippled 12” x  12” Designer Series Paper on the background. Then, I embellished with the Opaque Faceted Gems and Paper Butterfly Accents. Don’t forget the Softly Stippled Designer Series Paper is FREE with Any $50 or more order during Sale A Bration 2024!!


Here Are The Details:

I used the Stampin’ Blends Alcohol Markers to color the Paper Butterfly Accents. The layout for this Card is called Two of A Kind. Check out My YouTube Channel Tomorrow to See It In Action!


Card Measurements:

Calypso Coral Card Base: 5 1/2” x 8 1/2”
Basic White Card Layer: 5 1/4” x 4”
Softly Stippled Designer Series Paper Layer: 4” x 4” (Put at a diagonal in the Stampin’ Trimmer. Place the top edge at 1 1/4” and the bottom edge at 1 1/4”. Then, make a diagonal cut.)
Calypso Coral Strip Layer: 1/4” x 5”
Inside Basic White Card Layer: 5 1/4” x 4”

Paper: Basic White, Calypso Coral, Softly Stippled 12” x 12” Designer Series Paper, Paper Butterfly Accents 

Ink: Tuxedo Black Memento, Calypso Coral, Calypso Coral Stampin’ Blends, Daffodil Delight Stampin’ Blends, Granny Apple Green Stampin’ Blends

Stamp: Stippled Roses, Throughout The Year (Sentiment)

Accessories: Stippled Roses Dies, Stampin’ Cut And Emboss Machine, Stampin’ Brayer, Baker’s Twine Essential Pack, Opaque Faceted Gems

Happy Stamping!

Fantastic Friday - Paper Butterfly Accents Thank You Card (New Products!)


Good Morning Crafty Friends! My Fantastic Friday Share is a Thank You Card created with the New Stamping Up! Paper Butterfly Accents. I used the Basics 3D Embossing Folders on the background. Then, I embellished with the Opaque Faceted Gems and Sweet Sorbet 1/4” Bordered Ribbon. Look for these New Products in the Spring Mini Catalog and Sale A Bration Catalogs 2024!!


Here Are The Details:

The Sentiment comes from the Timeless Arrangements Bundle. Then, I used the Baby Wipe Technique to Color the Butterflies. Check out My YouTube Channel to See It In Action!


Card Measurements:

Pool Party Card Base: 4 1/4” x 11” 
Daffodil Delight Card Layer:  5 1/4” x 4” 
Basic White Card Layer: 5” x 3 3/4”

Paper: Basic White, Daffodil Delight, Pool Party, Paper Butterfly Accents

Ink: Daffodil Delight, Pool Party, Sweet Sorbet 

Stamp: Timeless Arrangements (Sentiment)

Accessories:  Timeless Arrangements Dies, Basics 3D Embossing Folders, Stampin’ Cut And Emboss Machine, Opaque Faceted Gems, Sweet Sorbet 1/4” Bordered Ribbon

Happy Stamping!

Fantastic Friday - Fruitful Blessings Double Fracture Fall Card


Good Morning  Crafty Friends! My Fantastic Friday Share is a Double Fracture Fall Card created with the Stampin' Up! Fruitful Blessings stamp and coordinating Fruitful Blessings dies. I used the All About Autumn Designer Series Paper on the background. Then, I embellished with Baker’s Twine Essential Pack and Adhesive-Backed Speckled Dots. I love this Fun and Easy Technique!


Here Are The Details:

I used the Stylish Shapes Dies to create the focal point on the card, and Stampin’ Blends Alcohol Markers to color the flowers. The Sentiment was stamped on one of the labels from the Something Fancy Dies.


Card Measurements:

Early Espresso Base: 4 1/4” x 11” 
All About Autumn 6” x 6” Designer Series Paper Layer: 5 1/4” x 4”
Early Espresso Card Stock Strips: 1/4” x 5 1/2” (4 Pieces)
Pumpkin Pie Card Stock Strips: 1/4” x 5 1/2” (4 Pieces)
Inside Very Vanilla Card Layer: 5 1/4” x 4”

Paper: Early Espresso, Pumpkin Pie, Very Vanilla, All About Autumn 6” x 6” Designer Series Paper 

Ink: Early Espresso Cajun Craze Stampin’ Blends, Daffodil Delight Stampin’ Blends, Moody Mauve Stampin’ Blends, Old Olive Stampin’ Blends, Pumpkin Pie Stampin’ Blends, Tuxedo Black Memento 

Stamp: Fruitful Blessings

Accessories: Fruitful Blessings Dies, Something Fancy Dies, Stylish Shapes Dies, Stampin’ Cut And Emboss Machine, Adhesive-Backed Speckled Dots, Baker’s Twine Essential Pack, 

Happy Stamping!

Fantastic Friday - Fragrant Flowers Fall Card (Quick And Easy!)


Good Morning  Crafty Friends! My Fantastic Friday Share is a Quick and Easy Fall Card created with the Stampin' Up! Fragrant Flowers stamp set. I used  a Technique called Thumping to get the look of Fall Leaves on the background. Then, I embellished with the Autumn Leaves dies, Baker’s Twine, and Adhesive-Backed Speckled Dots. Visit My YouTube Channel to see the Thumping Technique in Action!


Here Are The Details:

I used the Nested Essentials Dies to create the focal point on the card.


Card Measurements:

Moody Mauve Card Base: 4 1/4” x 11” 
Crumb Cake Card Layer: 5” x 3 3/4”
Basic White Card Layer: 4 3/4” x 3 1/2”

Paper: Basic White, Crumb Cake, Moody Mauve, Vellum

Ink: Crumb Cake, Stampin’ Write Markers (Crushed Curry, Moody Mauve, Mossy Meadow, Pumpkin Pie, Real Red)

Stamp: Fragrant Flowers, So Sincere (Sentiment)

Accessories: Autumn Leaves Dies, Nested Essentials Dies, Stampin’ Cut And Emboss Machine, 
Adhesive-Backed Speckled Dots, Baker’s Twine Essential Pack 

Happy Stamping!

Make It Monday - Earthen Textures Mock Shutter Thinking Of You Card


Good Morning Crafty Friends! My Make It Monday Share is a Mock Shutter Thinking Of You Card created with the Stampin' Up! Earthen Textures stamp set and coordinating Earthen Textures dies. I used the Earthen Elegance 12” x 12” Designer Series Paper on the background. Then, I die cut each of the pots from the Earthen Elegance Designer Series Paper as well. Finally, I embellished with the Iridescent Pastel Gems. and Natural 1/4” Wavy Trim. Don’t forget the Earthen Elegance 12” x 12” Designer Series Paper is On Sale For 15% Off!!


Here Are The Details:

I used the 1 7/8” x 1 7/8” Square Die from the Stylish Shapes Dies for the sentiment. Then, I added strips of Copper Clay card stock and Earthen Elegance Designer Series Paper around it to achieve the look of a Shutter Card.


Card Measurements:

Copper Clay Card Base: 4 1/4” x 11’
Very Vanilla Card Layer: 5 1/4” x 4”
Copper Clay Card Strips: 1/4” x 4” (4 Pieces)
Earthen Elegance 12” x 12” Designer Series Paper Layers: 3” x 6” (2 Pieces) and 3 3/8” x 6” (2 Pieces)

Paper: Copper Clay, Crumb Cake, Early Espresso, Very Vanilla, Earthen Elegance 12” x 12” Designer Series Paper 

Ink: Pecan Pie

Stamp: Earthen Textures, Wonderful Thoughts (Sentiment)

Accessories: Earthen Textures Dies, Stylish Shapes Dies, Stampin’ Cut And Emboss Machine, Iridescent Pastel Gems, Natural 1/4” Wavy Trim

Happy Stamping!

Fantastic Friday - Two-Tone Flora Faux Tile Sympathy Card


Good Morning Everyone! My Fantastic Friday Share is a Faux Tile Sympathy Card created with the Stampin' Up! Two-Tone Flora stamp set and coordinating Two-Tone Flora dies.. Cased from Kelly Acheson, I change the colors, and sentiment layers. Not only is this technique Quick and Easy, but also it can be adapted for other occasions as well.


Here Are The Details:

I used the Stampin’ Up! Simply Scored Scoring Tool on the background. Then, I stamped the flower images in between the “Faux Tile Lines”.


Card Measurements:

Balmy Blue Card Base: 5 1/2” x 8 1/2”
Starry Sky Card Layer: 5 1/4” x 4” 
Basic White Card Layer: 5” x 3 3/4” (Score at 1”, 2”, 3”, and 4”. Then turn and Score at 1”, 2”, and 3”)
Inside Basic White Card Layer: 5 1/4” x 4”

Paper: Basic White, Balmy Blue, Night of Navy, Vellum

Ink: Boho Blue, Daffodil Delight, Soft Succulent, Starry Sky 

Stamp: Two-Tone Flora, Something Fancy (Sentiment)

Accessories: Something Fancy Dies, Stylish Shapes Dies, Stampin’ Cut And Emboss Machine, Stampin’ Up! Simply Scored Scoring Tool, Glossy Dots Assortment 

Happy Stamping!

Fantastic Friday - Ringed With Nature Christmas Card Set (Quick And Easy Technique!)


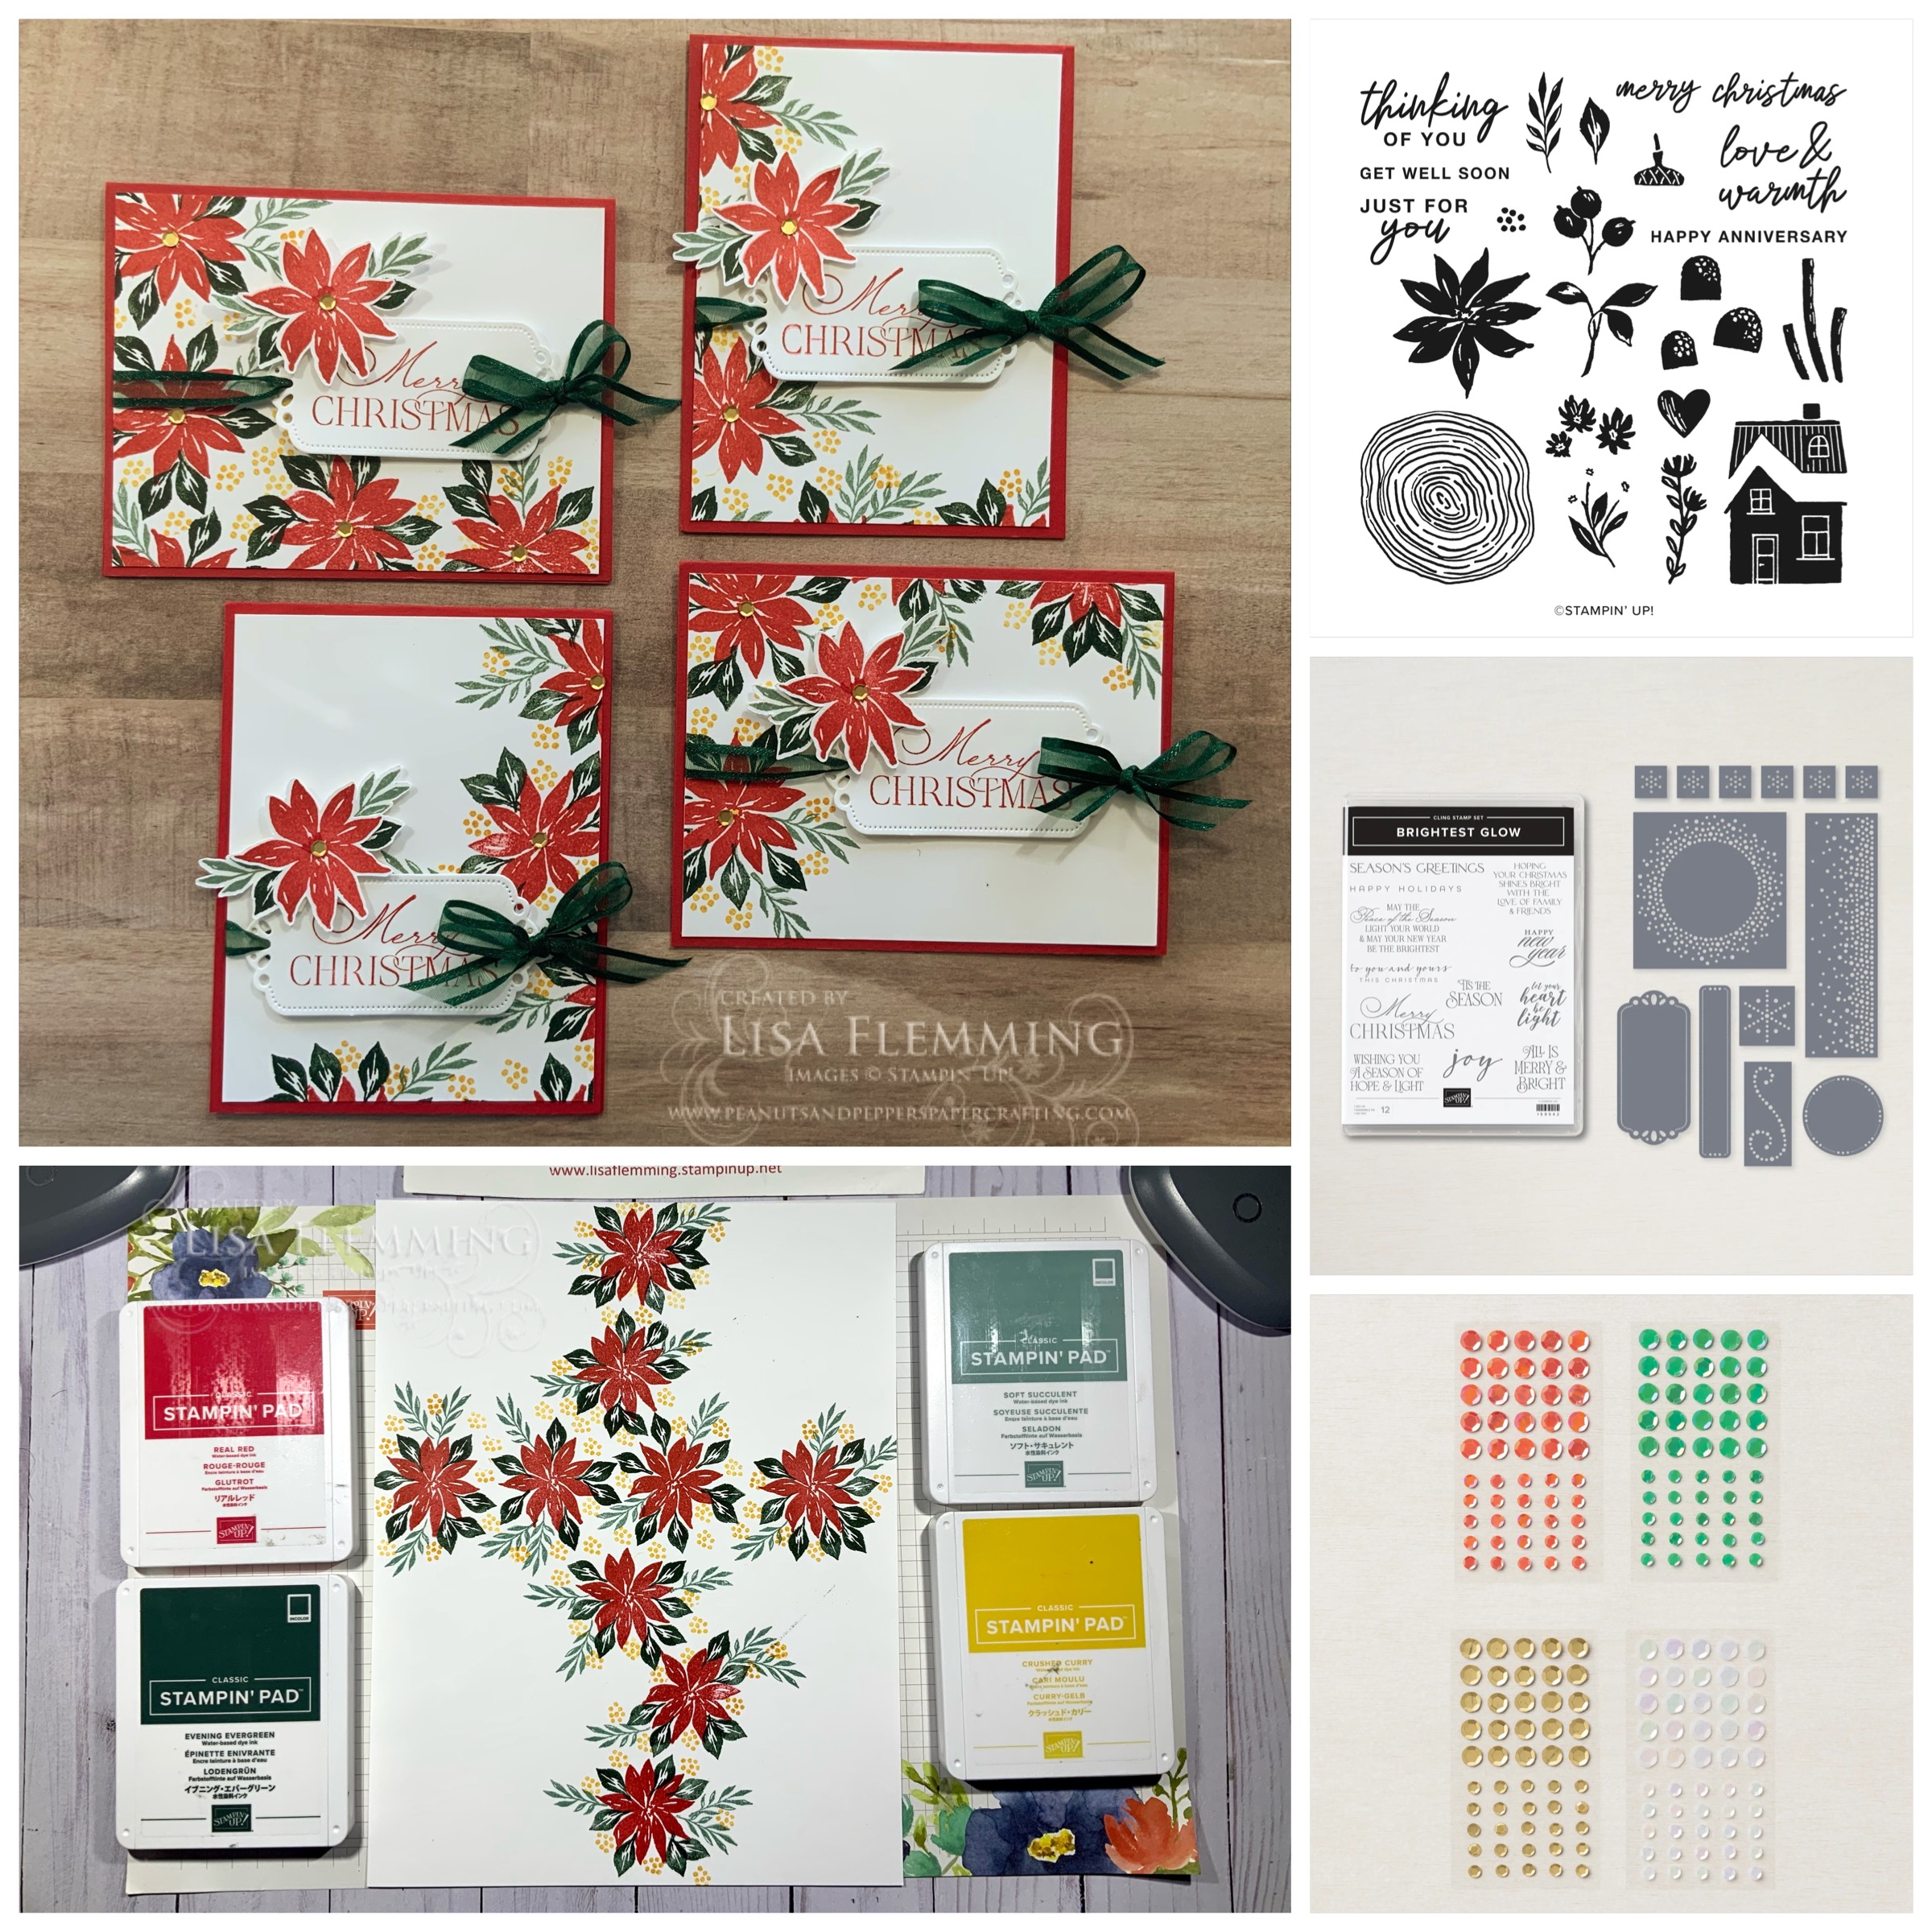
Good Morning Crafty Friends! My Fantastic Friday Share is a set of Christmas Cards created with the Ringed With Nature stamp set. I gave the “Four Cards At A Time” Stamping Technique a try, and I love the results! I used Real Red, Evening Evergreen, Soft Succulent, and Crushed Curry to stamp the background. Then, I cut it into 4 card layers. Next, I stamped and die cut my sentiments using the Brightest Glow stamp set and coordinating Labels Aglow dies, and adhered extra Poinsettias. Finally, I embellished with Evening Evergreen 3/8” Open Weave Ribbon and Adhesive-Backed Seasonal Sequins. I hope you give this Quick and Easy Cardmaking Technique a Try! 


Card Measurements:
Real Red Card Base: 5 1/2” x 8 1/2” (2) and 4 1/4” x 11” (2)
Basic White Card Layer: 5 1/4” x 4” (4 pieces)

Paper: Basic White, Real Red

Ink: Crushed Curry, Evening Evergreen, Real Red, Soft Succulent 

Stamp: Ringed With Nature, Brightest Glow (Sentiments)

Accessories: Labels Aglow Dies, Stampin’ Cut and Emboss Machine, Adhesive-Backed Seasoned Sequins, Evening Evergreen 3/8” Open Weave Ribbon

Product List

Happy Stamping!

Related Posts with Thumbnails
Blogger Template Created by pipdig