Make It Monday - So In Love In Color Note Cards


Good Morning Everyone! I hope you had a great weekend. I enjoyed the last few days of my Spring Break, and now it's back to school. My Make It Monday share is a set of Note Cards created with the Stampin' Up! So In Love stamp set and coordinating So Detailed Thinlits dies. By pairing this bundle with the Retiring In Colors 2015-2017 and the Papillon Potpourri stamp set, these cards were quick and easy to assemble.

Peanuts and Peppers Crafting Pointers:
  • Each Card Base is 4" x 8", which means you can get two cards from one sheet of card stock.
  • My Monochromatic Color Scheme included Mint Macaron, Watermelon Wonder, and Whisper White.
  • I stamped and punched the butterflies using the Elegant and Bitty Butterfly Punches.
  • I embellished with Pearls and Whisper White Baker's Twine to finish both cards off.

Card Measurements:
In Colors Card base: 4" x 8"
Whisper White Card Layer: 3 1/4" x 3 1/4"
In Colors Card Layer: 3 1/2" x 3 1/2"

Paper: Mint Macaron, Watermelon Wonder, Whisper White

Ink: Mint Macaron, Watermelon Wonder

Stamp: Papillon Potpourri, So In Love

Accessories: So Detailed Thinlits Dies, Big Shot, Bitty Butterfly Punch, Elegant Butterfly Punch, Pearls, Whisper White Baker's Twine


Happy Stamping!

Try It Thursday - Succulent Framelits Dies Treat Box


Good Morning Everyone! My Try It Thursday Share is a Treat Box created with the Stampin' Up! Succulent Framelits Dies. Inspired by Linda Heller, I changed the colors and a few details to make them my own. This project shows not only the versatility of the dies, but also, how they can be used for other occasions. Don't forget that the Succulent Framelits Dies are retiring, so get them while they last!

Peanuts and Peppers Crafting Pointers:
  • I used the 2' x 2" Clear Tiny Treat Boxes for my treats.
  • The Belly Band is created from the Succulent Garden Designer Series Paper.
  • The Succulent Flower is cut from Pool Party card stock and sponged in Rich Razzleberry Ink.
  • I embellished with Succulent Garden 3/8" Ribbon Combo Pack and Pearl in the middle of the flower.

Treat Box Belly Band Measurements:
1 Strip of Succulent Garden Designer Series Paper at: 1 1/2" x 9"
1 Strip of Succulent Garden Designer Series Paper at: 1/2" x 9"

Paper: Pool Party, Whisper White, Succulent Garden Designer Series Paper

Ink: Rich Razzleberry

Stamp: Bunny Buddies Paper Pumpkin Stamp

Accessories: Banners Framelits Dies, Succulent Framelits Dies, Big Shot, 2" x 2" Clear Tiny Treat Boxes, Pearl, Succulent Garden 3/8" Ribbon Combo Pack, Sponge Daubers


Happy Stamping!

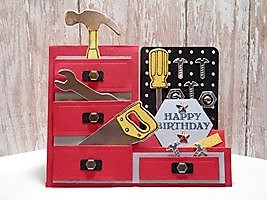
Try It Thursday - Stampin' Up! Nailed It Tool Box Birthday Card


Good Morning Everyone! My Try It Thursday share is a Birthday Card created with the Stampin' Up! Nailed It stamp set and coordinating Build It Framelits Dies. My DH celebrated a birthday on yesterday, so I wanted to do something extra special. Using a basic Side Step Card Fold, I transformed this card into a Tool Box, complete with nuts and bolts!

Peanuts and Peppers Crafting Pointers:
  • The base of this card is 5 1/2" x 8 1/2", which means you can get two cards from one sheet of card stock.
  • I used the Silver Foil Paper to give each tool a realistic metal finish.
  • The drawer handles were created from Ticket Duo Builder Punch and the Urban Underground Embellishments
  • The font from the Guy Greetings stamp set was perfect for my sentiment layer.

Card Measurements:
Real Red Card Base: 5 1/2" x 8 1/2"
Smoky Slate Card Layer: 5" x 3 7/8"
Real Red Card Layer: 2 3/8" x 1 (3 pieces)
Real Red Card Layer: 2 3/8" x 5/8" (1 piece)

Paper: Basic Black, Daffodil Delight, Real Red, Smoky Slate, Silver Foil

Ink: Black Memento

Stamp: Guy Greetings, Nailed It

Accessories: Build It Framelits Dies, Pegboard Die (from my stash), Big Shot, Ticket Duo Builder Punch, Urban Underground Embellishments

Product List

Happy Stamping!

Try It Thursday - Stampin' Up! Basket Bunch Mini Easter Baskets (Free Tutorial!)


Good Morning Everyone! My Try It Thursday Share are these adorable mini Easter Baskets, created with the Stampin' Up! Basket Bunch stamp set, and coordinating Basket Builder Framelits Dies. This project is another example of how versatile this Bundle is. Not only do you get the Bunny and various eggs, but also, chicks, peeps, flowers, carrots, and a chocolate bunny as well!  Thank you Martha Inchley for directions!

Paper: Chocolate Chip, Daffodil Delight, Melon Mambo, Old Olive, Whisper White

Ink: Chocolate Chip, Melon Mambo

Stamp: Basket Bunch, Bunny Buddies (March 2017 Paper Pumpkin Kit)

Accessories: Basket Builder Framelits Dies, Bitty Banners Framelits Dies, Big Shot, Candy


Basket Bunch Mini Easter Basket Tutorial


1. Die cut the handle, basket, and basket layer from cardstock.


2. Use adhesive to assemble each of the pieces together.


3. Cut a piece of cardstock at 1 1/4"x 3 1/4". Score on the 1 1/4" side at  1/4", and 1".


4. Turn the cardstock to the 3 1/4" side. Score at 1 1/8", and 2 1/8".


5. Use Paper Snips to angle cut each of the scored lines and form 6 little tabs.


6. Next, fold the tabs up on each of the scored lines.


7. Add adhesive to the tabs and attach the front and back basket layers.


8. You now have your basket base and it is ready to be decorated!


Product List


Happy Stamping!

Related Posts with Thumbnails
Blogger Template Created by pipdig