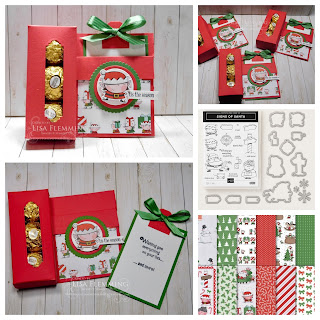
Good Morning Everyone! My Tuesday Tutorial is a Card and Candy Box created with the Stampin' Up! Santa's SignPost Framelits Dies. Inspired by Vanessa Stokes, I changed the colors, stamp, and papers for an alternative project. I used the Santa's Workshop Specialty Designer Series Paper on the background and focal point. Then I made the base using Poppy Parade card stock and the Petals & More Thinlits. Finally, I embellished with Garden Green Satin Ribbon. Not only was this box Quick and Easy, but also it can be used for other gifts, like tealight candles as well!
Card and Candy Box Measurements
Santa's Workshop Specialty Designer Series Paper: 2 3/4" x 2 3/4"
Garden Green Insert Layer: 2 1/2" x 3 3/4"
Whisper White Insert Layer: 2 1/4" x 3 1/2"
Paper: Garden Green, Poppy Parade, Whisper White, Santa's Workshop Specialty Designer Series Paper
Ink: Black Memento, Garden Green
Stamp: Itty Bitty Greetings
Accessories: Layering Circles Framelits Dies, Petals & More Thinlits (window), Santa's SignPost Framelits Dies, Big Shot, Banner Triple Punch, Circle Tab Punch, Garden Green Satin Ribbon, Ferrero Rocher Candy
Signs of Santa Card and Candy Box Tutorial
1. You will need 1 piece of Poppy Parade Card Stock cut at 12" x 6".
2. Next Score it at 1/2", 1 1/2", 3 1/4", 4 1/4", and 9".
3. Turn and Score it again at 1" on both sides.
4. Now cut off the end tabs as pictured.
5. Use the die from the Petals & More Thinlits to cut the candy box window.
6. Fold on the remaining Score Lines and add adhesive to form the Card Box Base.
Happy Stamping!


No comments
Post a Comment
Thank you for your kind words!