


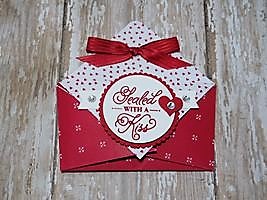
Good Morning Everyone! My Try It Thursday share is this Valentine's Day Treat Pouch created with the Stampin' Up! Sealed With Love stamp set and Sending Love Designer Series Paper Stack. Not only is it easy to assemble, but also, you can customize this pouch for other occasions as well. Keep reading below to see the Free Tutorial!
Treat Pouch Measurements:
Sending Love Designer Series Paper Stack: 6" x 6"
Paper: Real Red, Whisper White, Sending Love Designer Series Paper Stack
Ink: Real Red
Stamp: Sealed With Love
Accessories: Layering Circles Framelits Dies, Sweet & Sassy Framelits Dies, Big Shot, Banner Triple Punch, Project Life Corner Rounder Punch, Rhinestones, 3/8" Real Red Stitched Satin Ribbon, Candy
Valentine's Day Treat Pouch Tutorial


2. Fold the 6" x 6" piece of Sending Love Designer Series Paper in half so that it forms a triangle.
Use the Bone Folder to crease the edges.

3. Next, take the right corner of the Designer Series Paper and fold it towards the center of the triangle. Use the Bone Folder to crease the edge.

4. Repeat the same step on the left corner of the Designer Series Paper. Again using the Bone Folder to crease the edge.

5. Now take 1 of the top layers of the Designer Series Paper, and fold it down to form the pouch.

6. Use the Project Life Corner Rounder Punch to round the edges of the top and bottom layers.

7. Decorate as you desire and fill with candy!
Product List


 Stitched Satin Ribbon")
Happy Stamping!


No comments
Post a Comment
Thank you for your kind words!